How to create product images for Amazon’s children’s building block sets? A guide to ensuring consistency across the completed, disassembled, and assembly‑step visuals.
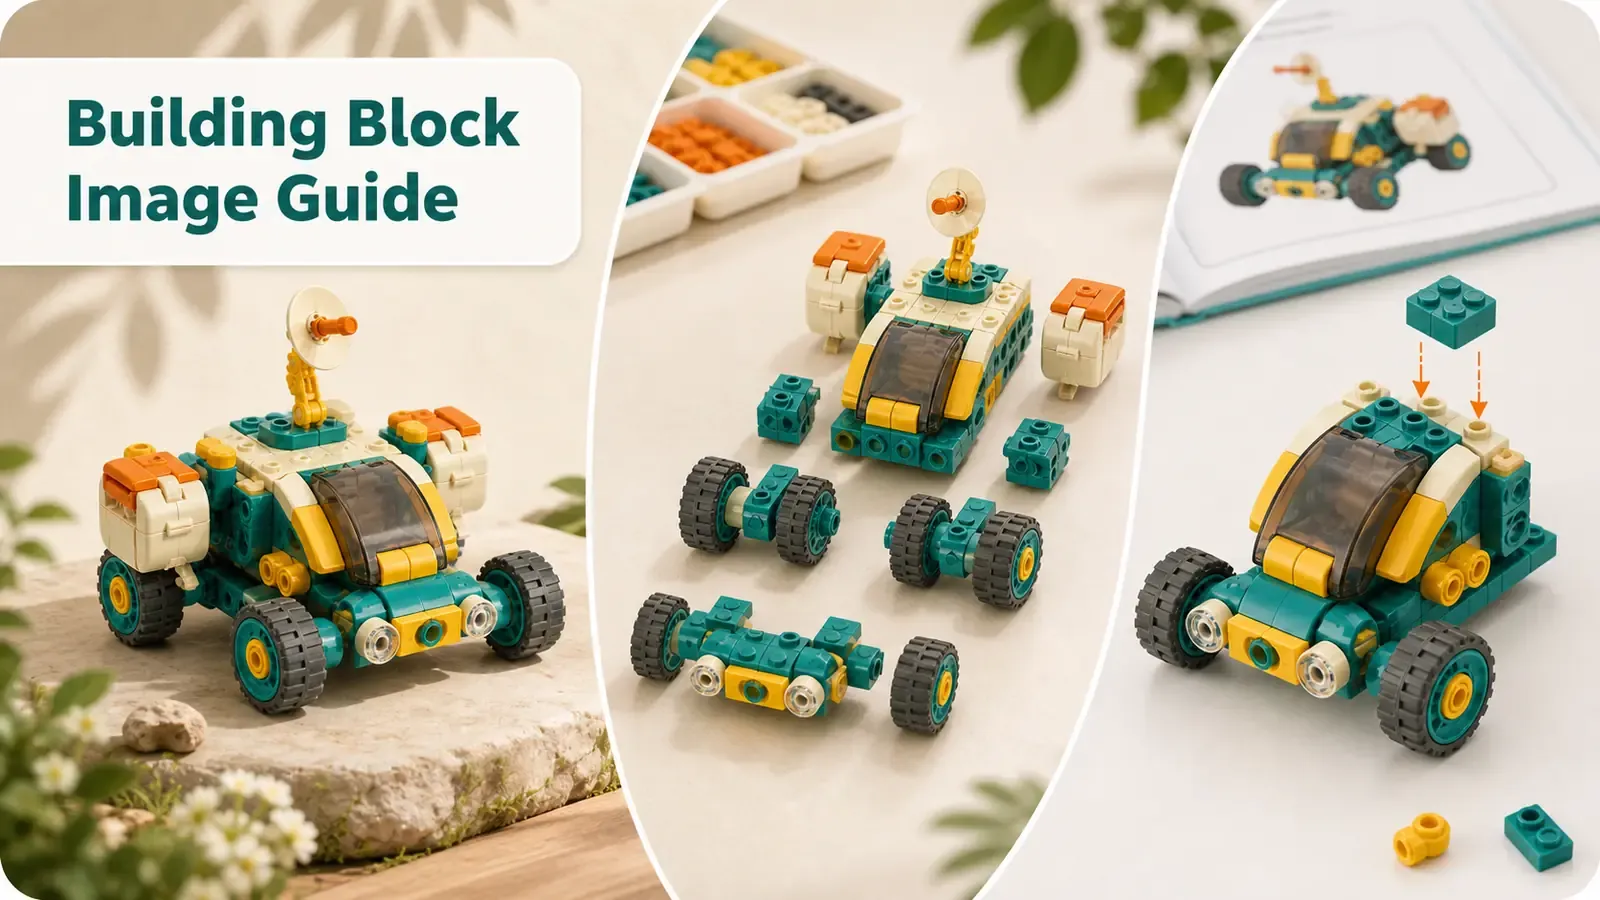
When creating illustrations for children’s building block product detail pages, the most hidden pitfalls lie not in scene aesthetics, but rather in structural errors stemming from and the continuation of . Relying solely on a single front-facing image of the finished product makes it difficult to clearly identify the top antenna, body structure, wheel assembly modules, and internal interfaces. If one attempts to infer disassembly logic and assembly steps based purely on visuals, the entire sequence of step-by-step images will suffer cascading inaccuracies, leading to misaligned parts, mismatched loops, and invalid assembly methods.
Illustrating building block products requires adhering to the principle of —first establishing the structure, then designing the visuals according to . The sole basis must be the official instruction manual, approved assembly steps, and real‑world reference objects; visual speculation to complete missing structural details is strictly prohibited. Many pages suffer from distorted information, buyers encounter assembly failures, and platforms flag listings as non‑compliant—all because of prioritizing visual completeness while neglecting the rigor required for accurate part counts, interface placements, and module assignments.
To produce compliant, traceable, and error-free detailed illustrations for building blocks, it is essential to follow a standardized production workflow: first lock down the final assembled state, then progressively break down the model into modular components and refine each assembly step. At every stage, cross‑check against the preceding state to ensure that each part has a clear origin, disassembly follows documented procedures, and all steps can be reliably reproduced.
This article outlines a practical set of standards for creating detailed product pages for children’s building block sets, clearly defining guidelines for receiving materials, producing illustrations, breaking down models, documenting assembly steps, and conducting quality assurance. It also delineates appropriate boundaries for using AI‑generated imagery and photo‑editing tools, addressing common issues such as structural inconsistencies, skipped steps, and cross‑category image mixing. These measures help operations teams efficiently generate e‑commerce visual content that is precise, compliant, logically consistent, and capable of answering customer inquiries .
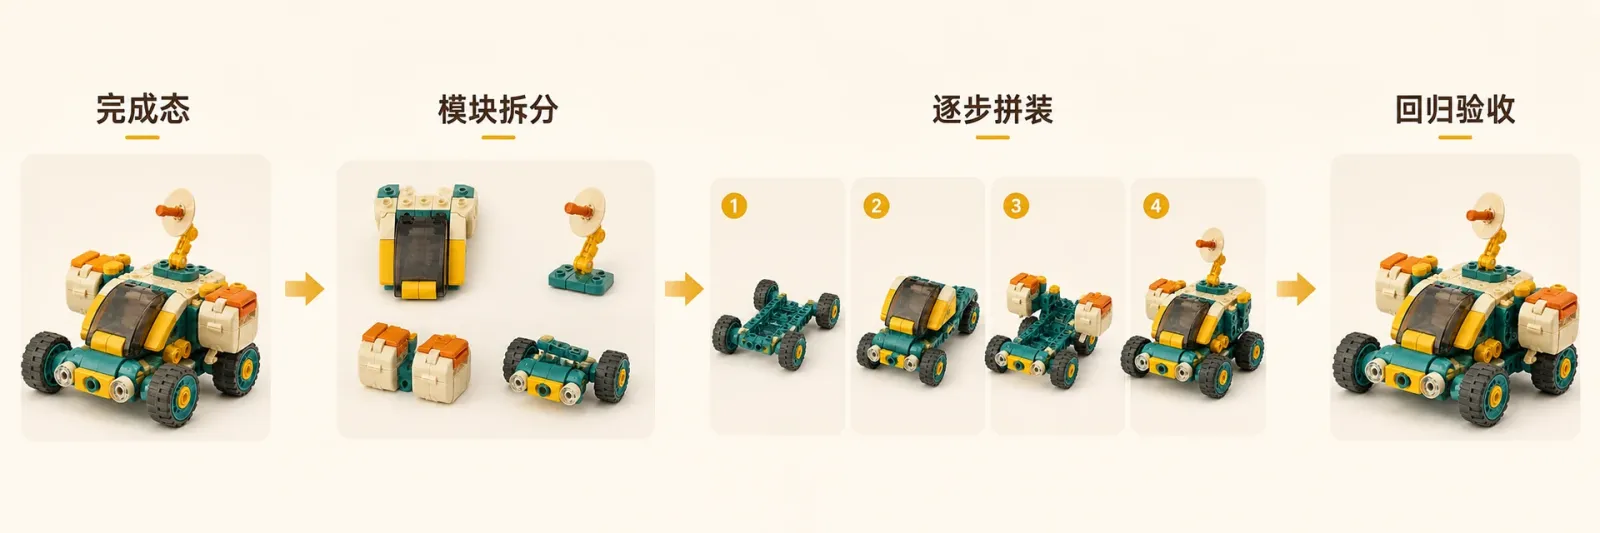
The top‑level overview illustration should capture the overall shape and key stages, while specific step‑by‑step images should adhere to the main text’s assembly instructions.
I. Receiving Materials: First freeze the completed state—do not guess starting from scattered parts.
Before beginning work, meet the material‑receiving threshold: you must simultaneously obtain the instruction manual or approved assembly steps, the packing list or parts inventory, along with a reference image showing the front view of the finished product and a clear view of the back‑side interfaces. If any of these are missing, request them from the supplier or take additional photos. Only when presented with individual part diagrams, a single front‑facing shot, or scenes where interfaces cannot be identified should you refrain from inferring structure from the image alone.
Next, capture three critical anchor points. The first category includes external contours, such as tower height, wheel placement, or animal head proportions; the second comprises connection points like door hinges, wheel axles, pins, and corner joints; the third consists of recurring features, such as windows, wheels, flowers, or character counts. Subsequent images should systematically verify these anchor points, avoiding reliance on vague impressions.
Amazon’s MAIN image must accurately depict the actual product being sold, using a plain white background without adding props, text, or illustrations unrelated to the purchase. For building block sets, the featured model, characters, and accompanying accessories must all belong to the current sales configuration. If the main image still needs to reconstruct missing structural elements from scratch, first photograph the physical product instead of treating generated images as evidence of structure.
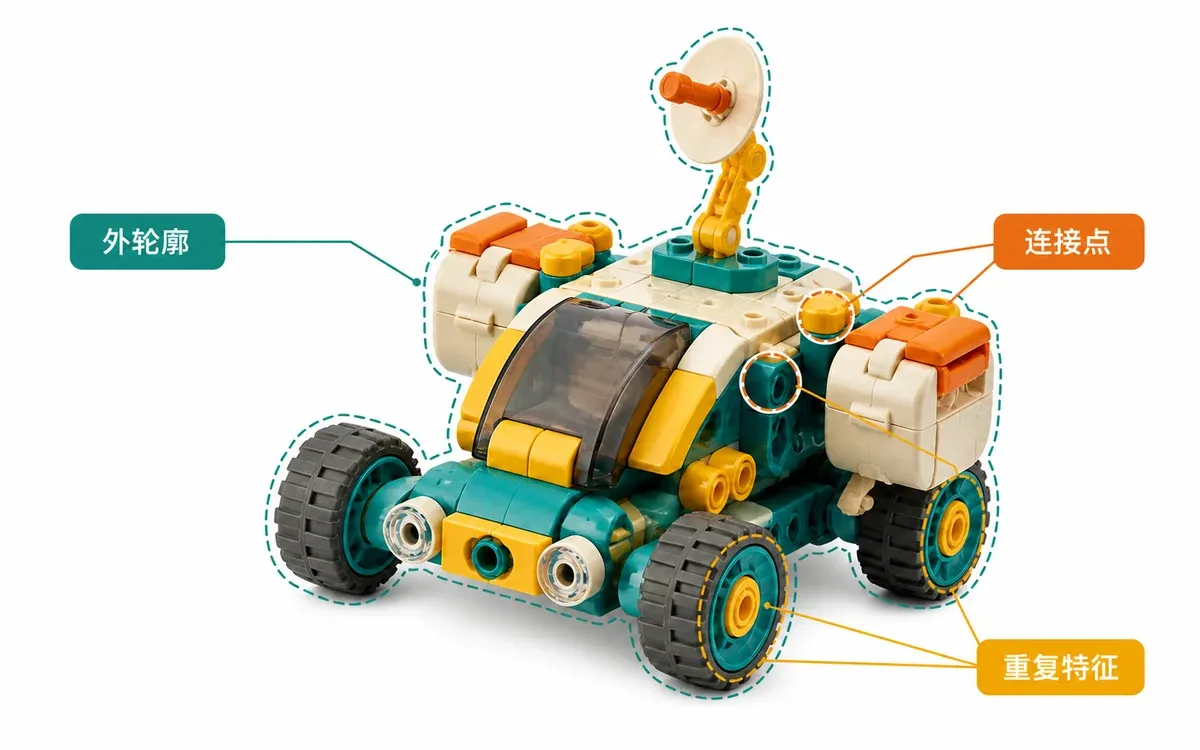
First fix the final structure, then decide which modules can be disassembled and which details must remain intact throughout.
II. Initial Illustration: The completed state confirms product identity but does not demonstrate every possible play style.
The completed‑state image should answer only one question: what will buyers receive after assembling according to the current instructions? The main model, included characters, and detachable accessories must be clearly distinguishable within the image, but avoid duplicating the same set of parts into two separate finished configurations just to showcase multiple play options.
When the same set of parts can be assembled into different models, do not present both designs side by side as “simultaneously included.” Unless the product genuinely comes with enough parts to support multiple configurations, clearly label these alternative assembly methods and specify in subsequent images that one design must be dismantled before another can be built.
If a real‑world photo of the finished product already exists but lacks rear views, overhead perspectives, or detailed connection angles, use to supplement the product’s full‑view images, filling in missing structural angles and scene details . Input reference images of the front, back, tricky interfaces, and key parts; after generation, verify against the established anchor points—do not rely solely on color similarity.
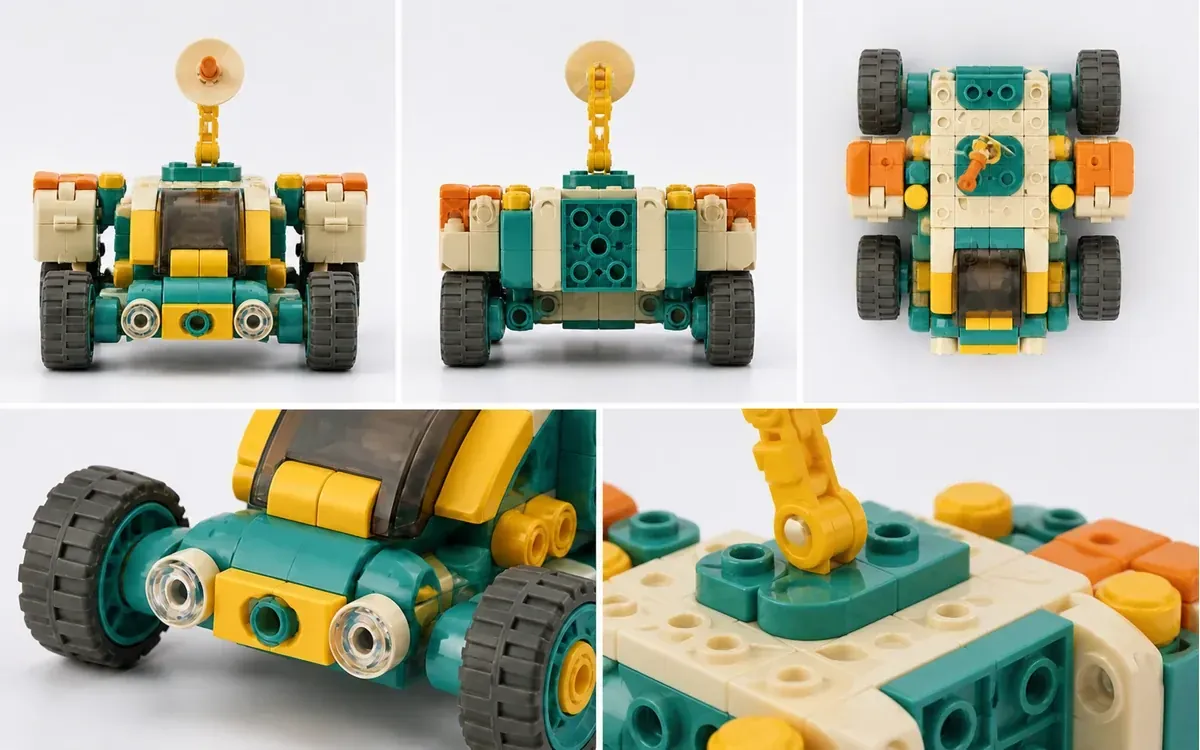
Change camera angles, but keep the model’s appearance unchanged; newly added perspectives must be mutually verifiable against the baseline completed image.
III. Disassembly Documentation: Return the finished model to its component modules, rather than scattering all parts onto the floor.
Disassembly illustrations are prone to errors because once the pieces are spread out, missing or extra parts become hard to spot. Begin by following the instruction manual or the actual disassembly sequence, returning the finished product to several identifiable modules—such as the base, left tower, right tower, bridge deck, and character components. After dismantling each group, mark the corresponding empty spaces on the completed‑state image.
Once module‑level disassembly is confirmed, proceed to lay out the smaller parts flat. Here, document “which parts were removed from which module,” rather than recreating an elaborate arrangement of building blocks. Parts of similar colors or shapes should especially retain their orientation and interface characteristics; internal components completely obscured by other parts must be verified through the instruction manual or physical disassembly, not inferred from the finished product’s appearance.
During disassembly verification, perform a reverse reconstruction: sequentially map each module group back to its designated position in the completed image. Parts with no known destination, structures lacking clear origins, or discrepancies between before-and-after counts—all require correction.
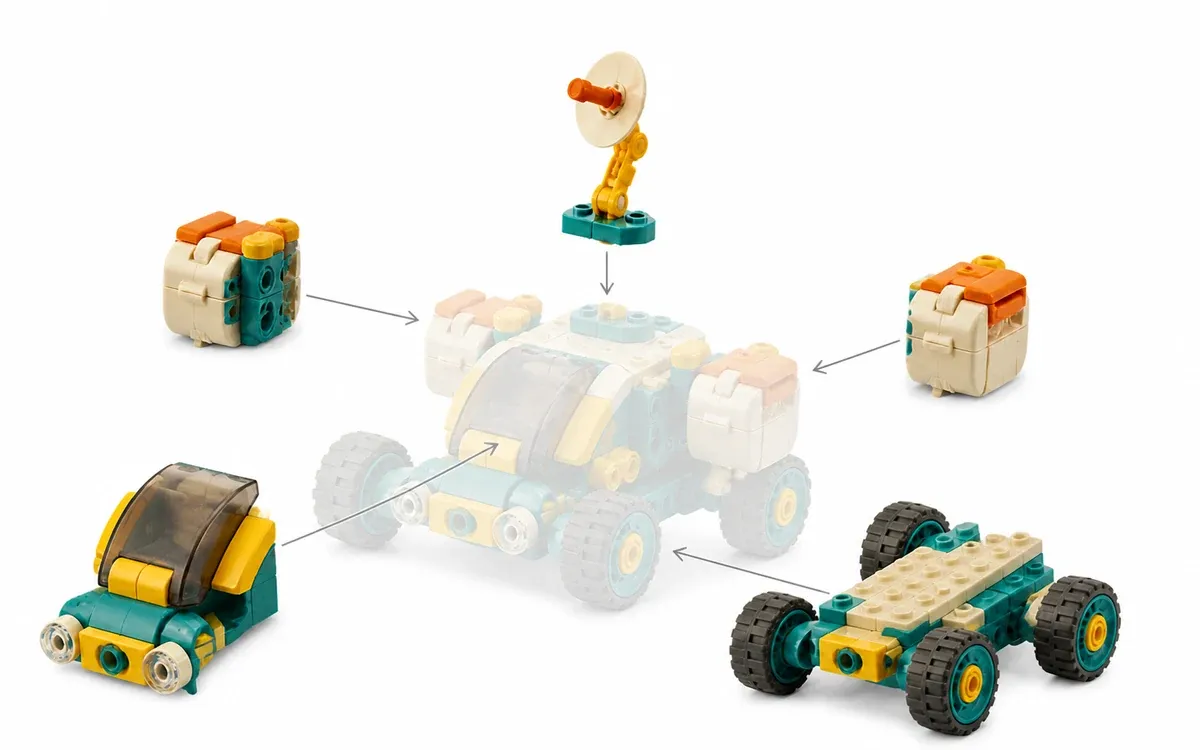
Every disassembled group must have a clear destination, and each key structural element in the completed image must be traceable to its source.
IV. Assembly Step Documentation: Each grid should reflect only one verifiable state change at a time.
A step is not considered “in progress” simply by placing your hand next to the building blocks. Between two adjacent steps, it should be clear which set of parts has been added, where they have been connected, and which interfaces remain exposed upon completion. If too many structural changes are skipped at once, readers cannot determine what happened in between, and the generated model may even secretly swap out parts.
Retain all previously completed structures from the preceding step, without backtracking or changing shapes.
Add only the modules required for the current step, with arrows pointing to actual connection points.
After completing the assembly, capture a still frame of the finished state to make the interfaces and orientations clearly visible.
Use this still frame as input for the next step, rather than reconstructing the intermediate process from the completed image.
Assembly storyboards must first be supplemented and approved according to the instruction manual. Once the final state, module breakdown, and individual part placements have been confirmed, you can use the A+ detail page tool to organize the final state, module breakdown, and assembly steps ; after generating the images, carefully check each frame for connection points and part quantities.
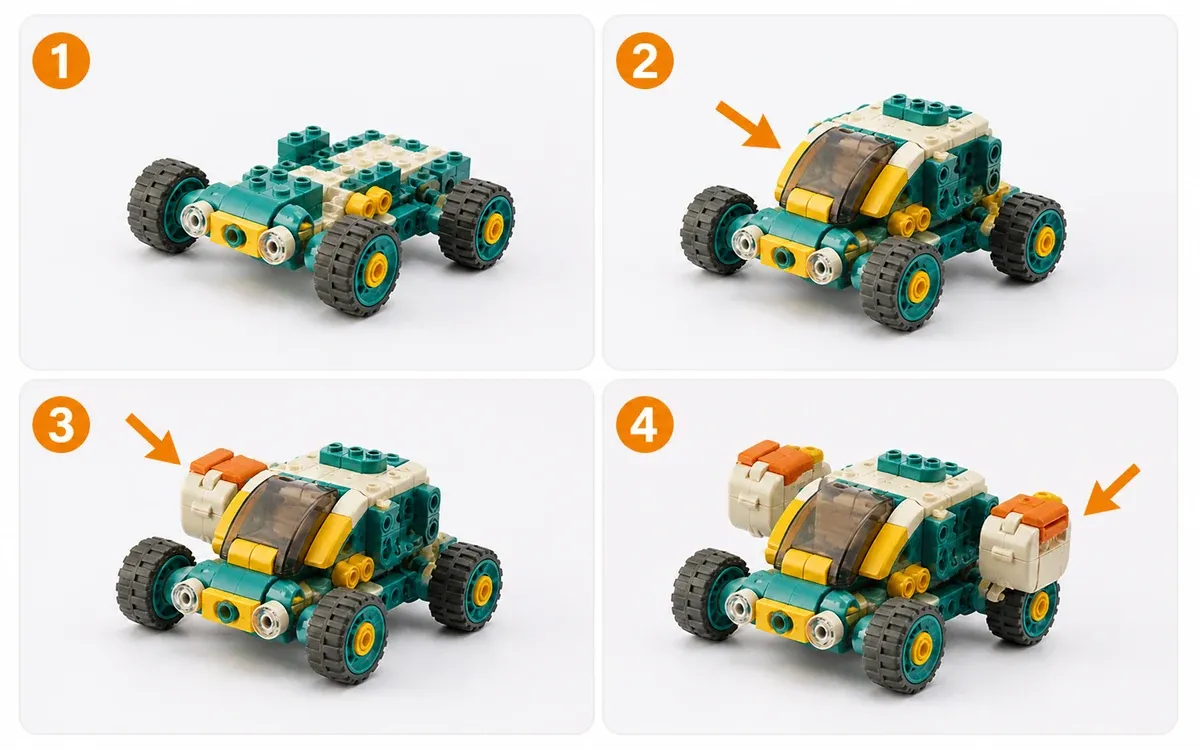
The previous step must fully transition into the next; if any intermediate structure suddenly disappears, all subsequent steps must be paused.
V. Delivery Regression: Revisit the split state and final state starting from the last step
Once the image library is complete, don’t just review each picture individually. Instead, trace backward through the sequence—“last step → final state → module breakdown → first image”—to more easily identify structural shifts made to ensure visual consistency.
Regression point | Through conditional checks | What to do after identifying issues |
|---|---|---|
Final step regarding the final state | Outlines, characters, attachments, and connection points perfectly aligned | Revert to the earliest step where discrepancies appeared, without patching the final image to conceal them |
Final state versus split state | All key modules have identifiable origins, and every extracted component has a clear destination | Re-disassemble or reshoot—do not substitute parts based solely on appearance |
Adjacent frames before and after each step | Each frame should only involve the newly described additions or connections | Break down large steps into smaller ones, capturing one frame of a verifiable still state |
All images correspond to the current SKU | Colors, printing, characters, and accessories remain consistent across batches | For entire sheets that need reworking, avoid patchwork repairs that produce mixed versions |
Background debris, minor scratches, or isolated reflections can be selected for localized refinements on the block surfaces and backgrounds . However, when part shapes, protrusions, holes, prints, or connection paths change, localized fixes are no longer sufficient; the model must return to its correct state and be regenerated.
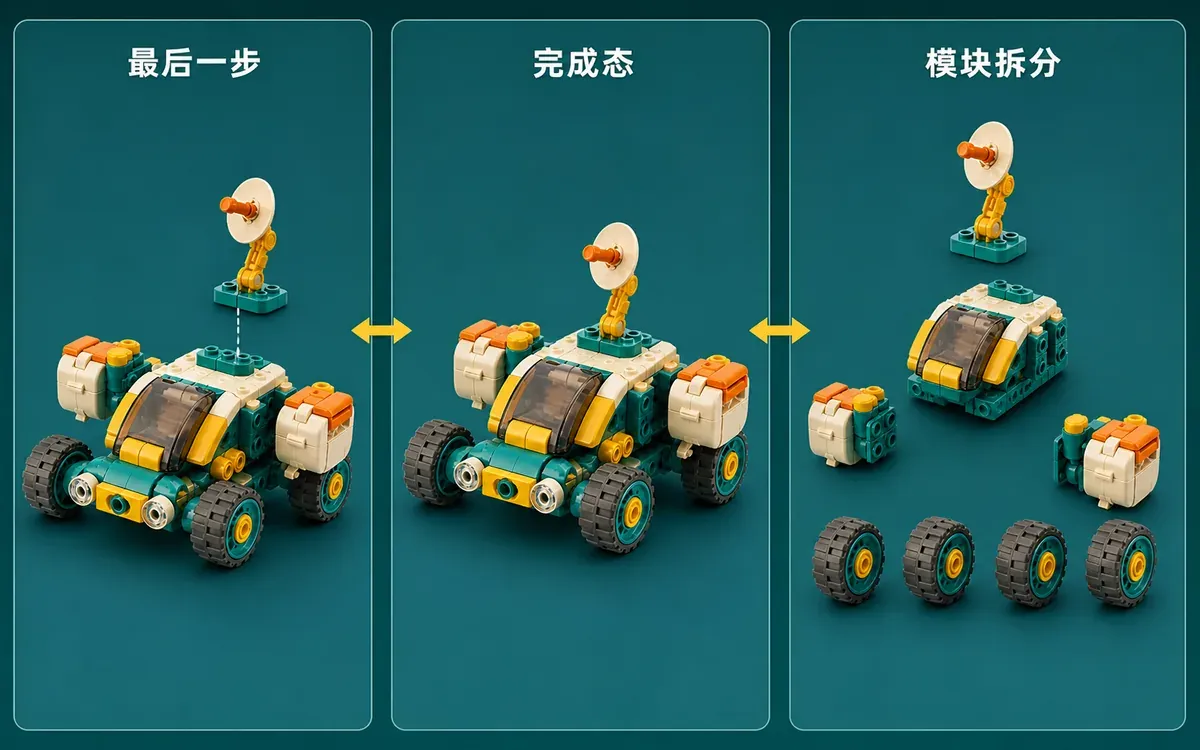
The left column shows only the antenna module awaiting assembly, the middle column displays the fully assembled state, and the right column returns to the approved modular disassembly; these three states should be mutually reversible within the same structural framework.
VI. Common Questions About Product Images for Amazon Children’s Building Block Sets
1. The set includes spare small parts—how should these be shown in product images?
Clearly distinguish between spare parts and those required for assembly, and adhere strictly to the current packaging and approved documentation. For both the completed and step-by-step states, use only the actual number of pieces needed for assembly; spare parts may be depicted in a separate packaging illustration but must not be crammed into the finished structure simply to show “everything used.”
2. If the parts are individually bagged, do product images need to show each bag opened?
There is no need to disrupt the original packaging logic just for presentation purposes. You can photograph unopened bags with their respective bag numbers, then select one set as an example of how it’s unpacked; ensure that bag numbers and step ranges correspond accurately to the instruction manual. If bagging methods vary across batches, avoid presenting any single bagging configuration as a permanent, unchanging standard.
3. Can images of children’s hands be used to demonstrate age appropriateness?
No. Hand‑related imagery can only provide visible proportions and operational postures; age‑appropriateness information must still be based on the product’s current approval labels, instruction manuals, and detail fields. When age and handling methods cannot be confirmed, it is safer to use images of adult hands or diagrams without human figures.

AI Image Tool Built for E-commerce Teams
For new product launches, advertising, and promotional campaigns, use AI to generate product images, scene visuals, ad creatives, and short video assets — making content production faster.